
How to Elevate Your Outdoor Grilling Game
Summer may be the height of the grilling season, but how do you rate your outdoor cooking skills? Many people feel intimidated by preparing food over flames, and things can go wrong regardless of whether you’re using wood, charcoal, or a gas grill.
Admittedly, you do need to adjust a few cooking techniques when cooking outdoors. And like many other activities, the key to success often hinges on adequate planning and preparation.
However, outdoor cooking doesn’t have to feel tricky. You can gain confidence and improve your results with several simple steps.
Step 1. Prep your food.
Before your meat, fish, or vegetables hit the grill, you’ll probably need to do some prep work in the kitchen. For example, if you’re grilling steaks, let them set out for 20-30 minutes and reach room temperature so the meat cooks more evenly.
Sausage skins frequently split when grilled, causing the meat to become dry as the juices run out. For moist and juicy results, try partially cooking sausages in a pot of simmering water before finishing them on the grill.
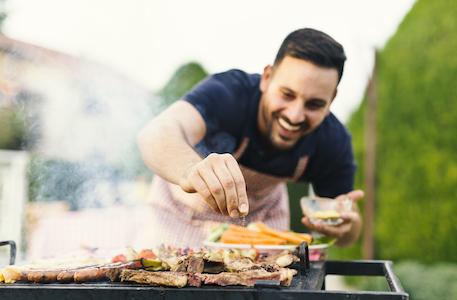
If you’re grilling kebabs, use two skewers per kebab so your meat and vegetables don’t spin on the stick while cooking. That way, turning and evenly cooking each side is much easier. Also, if you’re using wooden skewers, soak them in advance so they won’t burn.
For tasty corn on the cob, remove all but the innermost layers of the husk and soak the ears in cool water for 10-30 minutes before grilling. The water helps steam the corn, helping it stay moist.
Step 2. Get the grill ready.
Like cooking on a stovetop, you always want to start grilling food on a clean, hot surface.
If you’re grilling over charcoal, lighter fluid is a convenient way to fire up the briquettes. But since it releases toxic fumes that can leave unpleasant tastes or odors on your food, consumers are exploring alternatives like electric fire starters and charcoal chimneys.
Incidentally, you can make charcoal fire starters for practically nothing with dryer lint, candle wax, and a paper egg carton. It’s an easy, kid-friendly project.
Fill each compartment with lint and pour melted candle wax over the lint. Cut the carton apart and position a few cubes under your charcoal, where they’ll burn slowly, helping the briquettes take off.
Lighting a gas grill is much faster and easier, but you’ll want to ensure you have enough fuel to cook your meal. Another advantage is that you have more control over heat levels on a gas grill and can achieve higher temperatures than cooking over charcoal or wood.
Regardless of your heat source, ensuring that your grates are clean and that food won’t stick to them is essential. First, remove residual debris with a wire brush or wadded-up aluminum foil.
Then, turn your preheated grates into a non-stick cooking surface by rubbing a thin oil coating over the surface. Dip a heat-proof brush into a shallow bowl of neutral oil before lightly brushing the oil over the grates. Alternately, you can wad up a paper towel, dip it into oil, and use tongs to wipe the paper towel over the grates.
Some grillers recommend a different technique:
- Cut an onion in half.
- Dip one side into the oil.
- Rub the onion over the hot grilling surface.
In addition to cleaning and oiling the grates, the onion imparts some cooking flavor.
Step 3. Pull together your equipment.
Things happen quickly once your food hits the flames, so you don’t want to leave the grill. Instead, ensure you’ve assembled everything you’ll need, including essentials like long-handled grilling tongs, a spatula, a fork, fireproof oven mitts, and other helpful equipment.
For example, an instant-read meat thermometer can help ensure thicker cuts of meat are cooked through, and a brush helps apply layers of sauce or glaze. Also, collect any clean platters you’ll need to remove food from the grill and serve it.
Grab a small bowl of water, too. Immediately after the food comes off the grill, dip your wire brush into the water and rub down the grates. Repeat as needed to lift burned-on food remnants quickly.
Of course, keeping a fire extinguisher or a hose nearby is always a good idea in case your fire gets out of control unexpectedly.
Step 4. Start cooking!
How hot should your grill be? It depends on what you’re cooking. Generally, thin cuts like skirt steak are cooked quickly over high temps, whereas thicker cuts benefit from an initial sear followed by indirect and lower heat.
Many gas grills have shelves, a convenient way to continue cooking foods away from the flame. Or, you can keep a couple of burners off and move seared food off to that side. With charcoal or wood grilling, you must arrange the coals to create heat zones.
Remember that the lid also plays an essential role in capturing and holding heat. With a charcoal grill, you may need to adjust the vents above and below the briquettes so there’s enough air flowing to feed the flames.
Check for doneness a few minutes before the recommended time if you’re cooking meat. The meat will continue cooking after it’s removed from the grill, so factor in some “resting” time too. Move it to a platter and loosely cover it with aluminum foil until it’s ready to serve.
Step 5. Manage flare-ups.
Whether using gas or charcoal, you’ll undoubtedly encounter flare-ups when meat juices and marinades drip into the flames. When this happens, move the food away from the hot spot until the flame recedes.
Resist the temptation to spray water on the flame, especially on a charcoal grill. Otherwise, your food may become coated in a cloud of ashes.
Step 6. Enjoy!
The outdoor cooking season passes quickly, so savor every opportunity to enjoy meals made on the grill.