
A House for Bugs? Why Insect Shelters are Beneficial and How to Make One
For many homeowners, spring means spending time outside and working on projects to make their yards more enjoyable and to attract desirable wildlife. For example, there are many ways to make your yard more appealing to birds. But have you also considered attracting more bugs?
Why add an insect house?
It may seem counterintuitive to want more backyard bugs, but the vast majority of insects play a beneficial role, doing far more good than harm. For example, bugs help pollinate plants, eat smaller pests, and provide a critical food source for birds. Additionally, scientists concerned about significant declines in global insect populations.
In addition to promoting biodiversity, insect shelters make interesting and attractive garden features. By mixing various organic materials, you can create a unique, appealing artistic statement. Building a bug house is an excellent project for kids, too!
How to build a bug house?
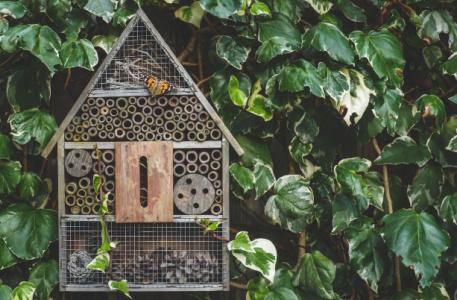
Insect shelters often resemble mosaics with numerous compartments holding different materials that appeal to various bugs. They can be any size or shape. You get to decide what looks and works best for you and your yard.
Step 1. Choose a location.
Pick a sunny spot and position the house at least three feet above the ground. It can be attached to a fence or posts, but ensure it’s secure and won’t move when windy. You can also mount it onto an exterior wall of your home.
If you want to attract other creatures like slugs, snails, and amphibians, consider building a larger structure from the ground up using wood pallets and bricks as the framework, then fill in the gaps with various organic materials.
Step 2. Collect and assemble your materials.
You’ll attract an excellent variety of bees, butterflies, lacewings, earwigs, and other beneficial insects if you include a mixture of these materials in your bug house:
Bamboo canes (assembled like straws so insects can access the open ends)
Deadwood blocks (with holes drilled into larger pieces)
Pine cones
Twigs and branches
Loose bark (small or large chunks)
Dead leaves
Straw
Pine needles
You may need to cut down longer or larger materials to fit neatly into each compartment.
Framing materials - Most bug houses are constructed with a wooden frame and plywood back. If you aren’t mounting it to another structure, you’ll need wood to attach “legs” to your frame. You’ll need a saw, hammer, drill, nails, screws, wood glue, and sandpaper to cut and assemble the frame.
Wire mesh - Some loose materials will fall out of your house unless you hold them in place with chicken wire or other wire mesh. A wire covering will also prevent some birds, like woodpeckers, from rapidly devouring your insect residents.
Cardboard, tiles, and recycled plastic bottles can help keep things organized. For example, you can cut off one end of a plastic bottle and fill it with bamboo canes, neatly arranged into a circle. Or, you can use tile or cardboard to create shelves to separate a layer of twigs from a layer of dried leaves.
Step 3. Maintaining your bug shelter.
Some insects will use your house to hibernate over the winter. Therefore, if you want to protect the shelter from heavy snow and ice damage, it’s okay to move it into an unheated shed or garage after the temperatures dip below freezing. But don’t bring it inside your home, where the heat will draw the bugs out of hibernation.
Be sure to move your bug house back into the yard early in the spring before the insects become active.
Once their activity picks up, gently remove any accumulated debris or mold so the house is clean and ready for new residents. Also, since bug houses include soft woody items prone to decay, you may need to replenish some sections periodically with fresh materials.